Followers

Showing posts with label StepbyStep. Show all posts

December 18, 2021

Free Standing Calendar Tutorial

Good evening everyone and welcome to my final tutorial of 2021. I can't believe how quickly this year has flown by. It definitely has had its ups and downs, hasn't it?! Hopefully 2022 will be a much better year for us all! 

Anyway...on to my project. For this one, I thought I would make one of my free standing calendars that I have been making for years. They are perfect for gifts and can be made in whatever size of shape you wish! 

I have used the gorgeous Chibi Happy Birthday for this image and went for a favourite combo of mine - pink and light brown. 

To start, I have cut all the card and patterned papers ready, but the base of the calendar will be a 7 inch square. Therefore, I have cut 1 piece of card at 7 x 7.5 inches and another at 7 x 9 inches. Once joined together, these will make the stand for the calendar. 


First, score the 7 x 7.5 inch piece of card at 7 inches.


On the other piece, score at 7, 7 3/4 and 8.5 inches. Fold the middle score line in the opposite direction to the other two folds - they should be valley and the middle score line should be a mountain fold.


Now join the two pieces together with a fold at each end. The double folded piece will be at the bottom of the calendar and the single fold will be at the top. 
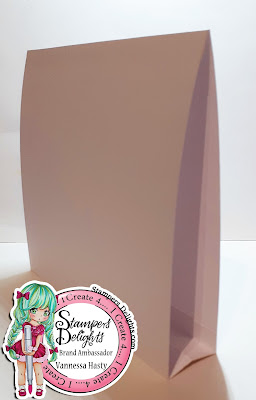

This is the side view... If you want a wider bottom section, then you just need to increase the size of the folded part. 


That is the base of the calendar made and now it's time to decorate... I added my layers of patterned papers and ribbon, but felt it needed something more so added some flowers and pearls to it as well.


And the side view again...


I hope you enjoyed this tutorial. I would love to see your own version, so do come on over to the Stampers Delights Facebook Group and share your projects with us all there! 

You can read more about this calendar and the Copic combos I have used to colour my image over on my blogpost here.

December 17, 2021

Acetate Card Tutorial

Good evening everyone, Brand Ambassador Vannessa here and welcome to my first tutorial of the month. For today's project I am going to show you how to make an acetate fronted card.  I have used the adorable Kawaii Coco 4 Coco digital stamp and sentiment for this card. 

Before I start I will apologise for the shine on the photos. Even with my desk lamp turned off, the acetate picked up all the shine from other lights in the room as well as that from my phone! 

To start you need some acetate 1 inch longer than your card front. I used some snowflake printed acetate sheets - perfect for the season! I also cut a piece of white card for the back of the card in the usual A6 size and then cut my layered card and patterned paper at 1/8" smaller each time. 

I also printed, coloured and cut my image ready to use and gathered some ribbon and some white card to make snow drifts as well as the sentiment and the layer for it too.


Next, you need to score and fold the acetate 1 inch from the end so the fold can be attached to the card back. 


Now attach the acetate to the card back so the folded part is inside the card. As acetate does not stick with glue, I used double sided tape for all the pieces being attached to it. 


This is how it looks from the side.


Now add the card mount and patterned paper to the inside, covering up the folded part of the acetate sheet.


As acetate has a tendency to bend, I added some snow drifts to the bottom, one on the outside and one on the inside. This provides some stability and strength to the bottom of the card.


I added some snowflake printed ribbon to top, attaching it with double sided tape again.


Now time to add my sentiment and Coco. For the sentiment I added the printed sentiment to the outside and the blue mount on the inside, making sure that none of the double sided tape could be seen.


And for some finishing touches, I added some Star Dust Stickles to the snow drift and the bobble on Coco's hat. 


And that's the card all finished. I love the effect the acetate gives this card. I really looks like he is outside in the snow enjoying his hot cup of cocoa! 

I hope you have enjoyed this tutorial. I would to see what you make with this card style, so be sure to share your projects over in the Stampers Delights Facebook Group.

You can read more about this card, including the Copic combos I have used over on my blogpost here.

December 11, 2021

Christamas Ornaments - Color Tutorial (two copic colors for each color)


Hi, 

Eivor here again, and today I am going to show you a Christmas Ornament with a image that I colored with less numbers of copics. I think it is good to show that you don't always need to have so many copics. 

I have made my ornament like a Christmas card, it means that I can send it to a friend to wish her Merry Christmas, and then she can hang it on the Christmas tree as a decoration. 
On my Christmas ornament I have used the beautiful stamp Anime Xmas Wreath. I think it is a beautiful stamp, perfekt for Christmas.

So to my tutorial...I have already colored her face and hair, so my tutorial is on the wreath, the ribbon and her top. 
We start with the wreath and the green colors. I started with G17 and I color around the sides and where I like it to be darkest.

The next, second color and also the last, is YG06. With this I go over G17 and exteding and coloring the hole space. After that I go back to G17, color the side/edges and then I take YG06 again and go over the hole space again. 

So to the ribbons and the red colors. I start with R29, go around the edges.

My next color is R24 and with that I go over R29, extending and then color the hole space. I also do the same as with the green. Go over the space with the colors again. First R29 and the R24 as the first time.

I also enclose photo on how I colored the bow. I used same red colors, R29 and R24 and did the same way. R29 where I wanted the bow a little darker.

Then it is time for the R24, extending and also coloring the hole space. Going over the bow once again first with R29 and then R24

 For the top I started with YR24.

My second color is Y15 and I am extending a little. As you can see I left some white space and I do that to get some more darker spaces. So now I go over the image again with YR24 and then Y15 and now I'm going over the hole space/top and filling the white space.

To make the ornaments I cut the image out with a round die, then I used another die with bubbly edge and cut two pices in red cardstock. I glued the red and white ribbon between the red cardstocks and then I glued the image on one side. 

Below is the backside of the ornament with the greeting "Merry Christmas", I will write mine and my familys name below when we send the card, thats why it is so white at this moment.

Hope you all liked my tutorial, and hope I can inspired anyone to try copics now when you see that you can create lovely colors with only two copics for each color. 

Thank you for stopping by today and hope you remember to check out our Stampers Delights Fan Group and also that you will join us in the mountly Progressive FB Challenge


November 20, 2021

Colouring a Winter Scene Tutorial

Good evening everyone! DT Vannessa here and welcome to my second tutorial of the month using one of the new digi releases from the Stampers Delights store. For today's project I have used the adorable Chibi Tumnus Fawn. I absolutely love The Lion, The Witch and the Wardrobe and my favourite TV version was the BBC adaptation from when I was a LOT younger, so I was so excited to see this new digi stamp! 

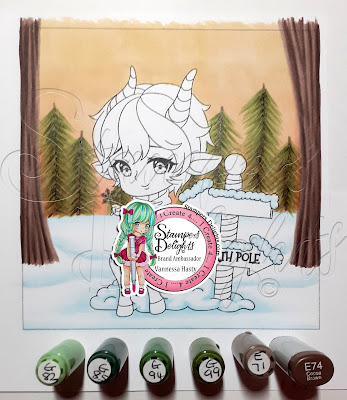
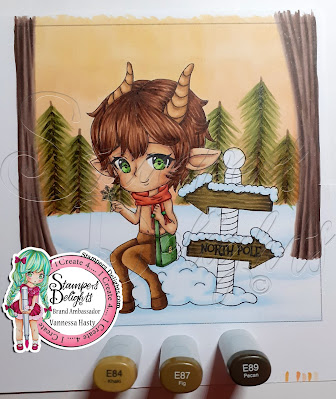
I thought I would share with you all my colouring of this scene step by step for this tutorial. I have added the colours used for each part in the photo, so hopefully that will make it easier for you to see how I coloured each section in. 

To start, I printed my image in a 5 inch square box. I always add a box for my images when colouring a scene so I have an idea of what the proportions need to be for the elements I am colouring. Using a light grey marker, I draw in the lines for where I want the snow drifts and trees to go. 


I always like to colour in the lightest areas first so these do not pick up any of the darker colours later on, so the snow comes next. You can see how that light grey adds some real depth to where the snow is. I only use a small amount of the blue markers, leaving most of the area white. 


The trees in the foreground are next. I have kept these leafless to give the impression that they are a lot taller than just the trunks we can see. 


Now it's time to add the sky. I decided I wanted a warmer colour combo for the sky so used my oranges, peaches and yellows this time. You can see I used lots of different colours and often went back and forth with the different markers to get the tone I wanted. 


I then added some fir trees in the background. 


Now it's time to start on my fawn. I always do the background before my image, so if I do make any major mistakes that I cannot fix, I can easily cut out my image and do the background again. 


Now the hair... You can see it's really starting to take shape a lot more now. 


Horns are next. I did google the colours beforehand to check I had the right shades of brown for the horns and hair. I know these are open to interpretation anyway, but I wanted to make my fawn really look like the Mr Tumnus from my childhood. 


Legs are next, using a similar shade to the horns to tie those two areas together. 


I added some red and green for the scarf next. The image just needed a little pop of colour after all those browns. 


Rather than doing a brown bag, I opted for green to pull that colour in from the trees. 


I also used green for the eyes.


Last little bit now - the sign post. I used one of my favourite combos for the wooden signs and tried to create the wood effect here. 


And now for the pole itself. The image is now complete. Now it's time to add it to my card and add some finishing touches. 


To make the card, I used brown and green card and made the base using one of my punch sets. I also used the sentiment that comes with the digi stamp and added some gems for a bit of sparkle. I also added some snowflakes using a paint pen, making sure to add some over the trees as well to show the snow is still falling. And although you can't see it in the photo, the snow on the ground and sign has some clear sparkle pen added to it as well


I hope you have enjoyed this tutorial and that it has inspired to colour your own backgrounds for any of the gorgeous Christmas and winter themed digis in the Stampers Delights store

You can read more about this project on my blogpost here. We would love to see your Stampers Delights project in our Facebook Group, so why head on over there and show us what you have been up to. 

November 19, 2021

Box In A Bag Tutorial

Good evening everyone and welcome to the first of my two tutorial posts for this month's new releases. 

For this project, I have used the gorgeous Anime Secret Santa digi stamp and the accompanying sentiment. 


I have made a Bag in a Box, which is perfect for small gifts this time of year. You could also reuse the bag as a Christmas tree decoration as well. 

For this project, you will need:
  • a 4.5 inch square for the base
  • a piece of patterned paper measuring 11 inches x 6.5 inches (or whatever height you prefer)
  • a piece of punched or die cut card measuring 11 inches long
  • some ribbons
  • a tab (I used a tag die and folded it in half before adding a punch out die for the ribbons to go through)
  • your stamped and coloured image
  • oval die cuts for the image to go on (or whatever shape you want)
  • the die cut sentiment and card to layer on


First you need to score at the 1 inch mark on each side of the card square. You also need to score diagonally in each corner. 


Fold and burnish using a bone folder and glue the corners together to make the square base. 


Add some double sided tape along one long and one short edge only of the patterned paper. Line up the bottom of your box against the patterned paper and roll the paper around each side, ensuring it is stuck well to the base. Remove the backing from the short side and attach to the start of the patterned paper to close the bag. 

This is how it will look after you have finished this step.


Now it's time to decorate... I added the punched strip to the bottom with the green strip of card in the middle. You could easily use ribbon here instead of card. I added my digi stamp to the oval die cuts and attached with glue on just the centre of the die to the bag. I added one of the tab dies to each side of the bag and closed it using two different ribbons. 


On the back, I added the sentiment after attaching it to some red card and fussy cutting the shape out. (The die I used didn't have a larger size for mounting).


I hope you have enjoyed this tutorial. We would love to see all your projects in the Stamper Delights Fan Facebook Group, so do share them there! 

You can read more about this project including the Copic combos I used on my blogpost here

Sponsorship Design Team

  Hey friends! Hope you all are doing great! We have new projects to share with you today and I hope you will visit each of them and give th...