

Good evening everyone! DT Vannessa here and welcome to my second tutorial of the month using one of the new digi releases from the Stampers Delights store. For today's project I have used the adorable Chibi Tumnus Fawn. I absolutely love The Lion, The Witch and the Wardrobe and my favourite TV version was the BBC adaptation from when I was a LOT younger, so I was so excited to see this new digi stamp!
I thought I would share with you all my colouring of this scene step by step for this tutorial. I have added the colours used for each part in the photo, so hopefully that will make it easier for you to see how I coloured each section in.
To start, I printed my image in a 5 inch square box. I always add a box for my images when colouring a scene so I have an idea of what the proportions need to be for the elements I am colouring. Using a light grey marker, I draw in the lines for where I want the snow drifts and trees to go.

I always like to colour in the lightest areas first so these do not pick up any of the darker colours later on, so the snow comes next. You can see how that light grey adds some real depth to where the snow is. I only use a small amount of the blue markers, leaving most of the area white.

The trees in the foreground are next. I have kept these leafless to give the impression that they are a lot taller than just the trunks we can see.

Now it's time to add the sky. I decided I wanted a warmer colour combo for the sky so used my oranges, peaches and yellows this time. You can see I used lots of different colours and often went back and forth with the different markers to get the tone I wanted.

I then added some fir trees in the background.
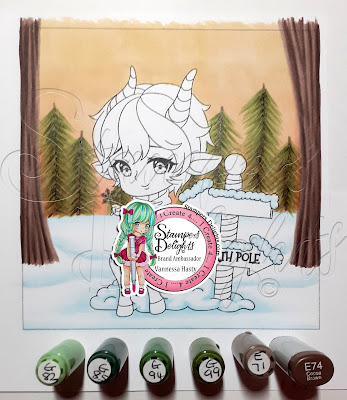
Now it's time to start on my fawn. I always do the background before my image, so if I do make any major mistakes that I cannot fix, I can easily cut out my image and do the background again.

Now the hair... You can see it's really starting to take shape a lot more now.

Horns are next. I did google the colours beforehand to check I had the right shades of brown for the horns and hair. I know these are open to interpretation anyway, but I wanted to make my fawn really look like the Mr Tumnus from my childhood.

Legs are next, using a similar shade to the horns to tie those two areas together.

I added some red and green for the scarf next. The image just needed a little pop of colour after all those browns.

Rather than doing a brown bag, I opted for green to pull that colour in from the trees.

I also used green for the eyes.

Last little bit now - the sign post. I used one of my favourite combos for the wooden signs and tried to create the wood effect here.

And now for the pole itself. The image is now complete. Now it's time to add it to my card and add some finishing touches.

To make the card, I used brown and green card and made the base using one of my punch sets. I also used the sentiment that comes with the digi stamp and added some gems for a bit of sparkle. I also added some snowflakes using a paint pen, making sure to add some over the trees as well to show the snow is still falling. And although you can't see it in the photo, the snow on the ground and sign has some clear sparkle pen added to it as well

I hope you have enjoyed this tutorial and that it has inspired to colour your own backgrounds for any of the gorgeous Christmas and winter themed digis in the Stampers Delights store.
You can read more about this project on my blogpost here. We would love to see your Stampers Delights project in our Facebook Group, so why head on over there and show us what you have been up to.


No comments:
Post a Comment