Followers

Showing posts with label Copic sketch. Show all posts

December 11, 2021

Christamas Ornaments - Color Tutorial (two copic colors for each color)


Hi, 

Eivor here again, and today I am going to show you a Christmas Ornament with a image that I colored with less numbers of copics. I think it is good to show that you don't always need to have so many copics. 

I have made my ornament like a Christmas card, it means that I can send it to a friend to wish her Merry Christmas, and then she can hang it on the Christmas tree as a decoration. 
On my Christmas ornament I have used the beautiful stamp Anime Xmas Wreath. I think it is a beautiful stamp, perfekt for Christmas.

So to my tutorial...I have already colored her face and hair, so my tutorial is on the wreath, the ribbon and her top. 
We start with the wreath and the green colors. I started with G17 and I color around the sides and where I like it to be darkest.

The next, second color and also the last, is YG06. With this I go over G17 and exteding and coloring the hole space. After that I go back to G17, color the side/edges and then I take YG06 again and go over the hole space again. 

So to the ribbons and the red colors. I start with R29, go around the edges.

My next color is R24 and with that I go over R29, extending and then color the hole space. I also do the same as with the green. Go over the space with the colors again. First R29 and the R24 as the first time.

I also enclose photo on how I colored the bow. I used same red colors, R29 and R24 and did the same way. R29 where I wanted the bow a little darker.

Then it is time for the R24, extending and also coloring the hole space. Going over the bow once again first with R29 and then R24

 For the top I started with YR24.

My second color is Y15 and I am extending a little. As you can see I left some white space and I do that to get some more darker spaces. So now I go over the image again with YR24 and then Y15 and now I'm going over the hole space/top and filling the white space.

To make the ornaments I cut the image out with a round die, then I used another die with bubbly edge and cut two pices in red cardstock. I glued the red and white ribbon between the red cardstocks and then I glued the image on one side. 

Below is the backside of the ornament with the greeting "Merry Christmas", I will write mine and my familys name below when we send the card, thats why it is so white at this moment.

Hope you all liked my tutorial, and hope I can inspired anyone to try copics now when you see that you can create lovely colors with only two copics for each color. 

Thank you for stopping by today and hope you remember to check out our Stampers Delights Fan Group and also that you will join us in the mountly Progressive FB Challenge


December 10, 2021

Christmas Gift Tag - Coloring tutorial


Hi everyone, 

Eivor here and today I am going to show you how I colored an image on a Christmas gift tag. I used the digital stamp Kawaii Xmas Elf Gift and I think he is so cute!

But before I start to show you my coloring tutorial I want to tell you, so you don't miss, that in the shop all the "X-mas & Winter" and also all "Halloween" products are on SALE!! You get them for £1.50 !! Check out the SHOP!


So it is time for my coloring tutorial and I have colored the image with copics.
I will show you how I colored the clothes on the cute Elf, and we start with his hat.

I start with the darkest red and that is R89. I colored around the edges, where I want the hat to be darkest. 

My next color is R37, and i am extending the color just a little.

I then take R29 and extending a lot more, but leaving a space for the lightest color.

So to the last and lightest red color, R24. I now color the whole image. After this last red color I start from the beginning with the darkest color and go over the hat one more time. 

Now to the sweater and pants. For this  the blue color I used. I started with B93, and colored around the edges, where I wanted it to be darkest.

My next color is B91, and I am just going over the first color a little and extending.

I thought I could show that I am turning my image around and around, up and down when I color. I do that because it gives me more controll of the coloring.

So to my last blue color that is BG70. It is light so I have to go work a little more to get the colors to blend.

The shoes I wanted light brown, so I started with E43 and I go around the edges.

My next and second color is E42. I am going over the first color and extending a little. It is a small space so just need to extend a little. The last color I used on the shoes was E41, but I forgott to take a photo...


As I forgott to take a photo on the last color on the shoes I can show you that I colored the gloves on the same way, and the last color is E41. 

Now it is time for the white on the hat. I don't know how you feel, but I think it is difficult to color white spaces. I want to get better on it so I need to practice!!
On this image I started with C1. I go light, for me it is better and hopefully the image wont be destroyed...I start to draw a few lines/strokes and I leave a lot of white space. 

My next color was C0. I go over the all ready draw lines to blend and soft them up, not extending. 

My last color is C00 and with that I just gently going over the lines to blend a little more.

Hope you liked my turorial with the colors i used and that you got some inspiration.

Below you can see my finish Christmas gift tag. The text comes with the digi stamp.


Thank you for stopping by today and see you soon again (tomorrow) with another coloring tutorial. It will not be as many pictures like today *lol*

Remember to check out our group Stampers Delights Fan Group on Facebook. It is always a lot of inspirations there! And there you also can find our montly Progressive FB Challenge.


November 14, 2021

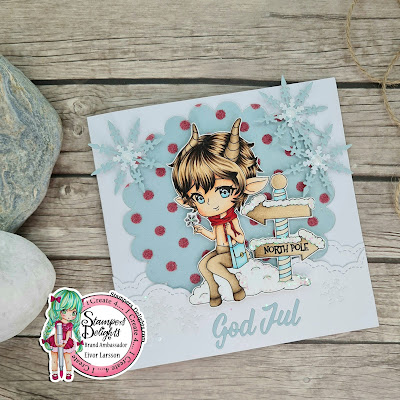
X-mas image with Glittery snow tutorial


Hi, 
Eivor here again, and today I want to show you a tutorial how to make glittery snow in a pretty easy way.


I have some problems and I think it is difficult to get "a good looking" snow when I make my cards, so I thought I could try something else and not use my copic markers. 

The image I used today is Chibi Tumnus Fawn


This image you can get in both winter and spring version. So so nice!!

So to my tutorial...


This is what I used for my tutorial today. The colored image (of curse), then glossy accent glue, a needle and the GLITTER!


I have a small dollop with glue on a paper, a needle and my glitter. I wanted to used the needle and take some glue on the needle and place the glue gently on the areas I want. If I do that, I think I have better controll of where to place the glue. Then I  poured the glitter over the glued area and let it dry. To get the extra glitter to fall off I tapped a little and gentle on the image. As you can see on the photo the glitter is all over the paper and the image...*smile*. 

This is it, a easy way to make your Christmas (or any other card) glitterly and shiny!


I hope you can see the glittery "snow" on the road arrows and the little snow hill. I love how it is different colors in different lights and angles, and how it glitter!! 


Thank you for stopping by today and I hope you liked my tutorial. If you have other ideas how to make snow please share this with us at Stampers Delights Facebook Fan Group. We love to see! 


November 13, 2021

Paper Piecing tutorial with the new Anime stamp Secret Santa


Hi everyone, 

Eivor here and today I am going to show you how to make a card with the technique "paper piecing" with a digital stamp. For my project I have used the new released stamp Secret Santa, she is so perfect for Christmas cards and other Christmas projects.


The papers I used on my Christmas card is from Pion Design and they are very soft and light colored, but so beautiful. I have done different layers and roughened the edges.


You can find the digi stamp in the shop HERE  and I really love the sentiment also, so perfect for Christmas. 

With paper piecing I wanted to show that if you dont like to color, if you dont have any coloring tools you can use all different papers you have and do beautiful cards just by using the printer, scissor and glue. 


First of all I printed the image an a paper for copics so I could color the skin and hair on the image. Then I used four different pattern papers to print the image on and then I started to cut out the pices I wanted.


After been cutting, cutting and cutting I choosen the pices I wanted. Maybe this image wasen't the easiest to do paper piecing with, so so many small pieces. *smile*. 
But I like doing it, had a plan how I wanted the card to be, so I keeped cuting. Then I glued the different pieces on the image I printed on the white copic paper. 

I did the card with different layers, with the same patterna paper and some distance tape


Hope you like my tutorial and try to use the scissor and some beautiful pattern papers you have. 

I like you to visit Stampers Delights Facebook Fan Group, it is always a lot of beautiful projects from our members and our design team. 

Thank you for stopping by today.


October 02, 2021

New Anime Clear stamp Coloring video - Flower pattern


Hi,

Eivor here, and today I am going to show you a copic tutorial video. I am coloring the new clear stamp "Anime Cheers" top in a flower pattern. 

I made a tag this time, and I think it will be perfect to tie for example on a bottle. A perfect thing to give to the host if you go to a dinner or a party. Maybe the New Years party?!

Here you can see the stamp set, with all different words, numbers at a beautiful clock. 

Now it is time to show my first coloring video...hope you like it.

I have used the color R20 and R22 for my flowers. 

Below I also edit some pictures on my tutorial.

First R20 (the brightest)

Second color R22

When the flowers are done. I let the image rest for a while, so the ink can dry just a little and then I color the hole top with R000. Just to get a soft soft color top. I don't go over the flowers just arround.

I like to remind you all of our Progressive FB Challenge for October that is live now and also to join our Stampers Delights Fan Group on Facebook.

I hope you seen all our blogpost for this weekend, when it is relese weekend it happens so much here. I also like to remind you to check out our blog little now and then during the month, you never know when and what might happen here.


Sponsorship Design Team

  Hey friends! Hope you all are doing great! We have new projects to share with you today and I hope you will visit each of them and give th...