Followers

August 28, 2021

Halloween Slimline Video


 Hi everyone! Brand Ambassador kel here to share a quick coloring & foiling video with you using the new Chibi release Too Cute To Spook. She comes as a Clear Stamp but I'm working with her as a digital stamp which is also available in the Stampers Delights store


She is so cute with her jack o'lantern!! And I know you can't really tell in the picture because of the glare but the sentiment (which is from the Kawaii Halloween Pal Pumpkin Pete stamp set) is foiled with a nice and shiny gold foil... you can kind of see it in the close-up picture. 


And here's the coloring, foiling, and assembly video - I only speak in the very beginning to introduce the project. The video's sped up 4-8x so this card took me just under an hour to complete. And I always leave the reds and pinks for last because I find that they tend to bleed a bit more easily!!


And if it doesn't work, click here to see the video on

Thanks for joining me and see you again soon!

lovies, =o) kel

August 27, 2021

Halloween Scrapbook Layout - Photo Flip


Hi everyone! Brand Ambassador kel here to share a super fun scrapbook page with you using the new Kawaii Halloween Pal Pumpkin Pete AND the new Kawaii Halloween Pal Frankie Stein. They comes as Clear Stamps but I'm working with them as digital stamps which are also available in the Stampers Delights store!


I absolutely LOVE Halloween and was so excited to play with these two little dudes on a scrapbook layout!! 

The first thing I did was to collect a couple pieces of patterned paper and some coordinating cardstock. Even though I'm creating a 12" x 12" layout, I like to also pull some 8.5" x 11" cardstock for the smaller elements like photo mats and in this case, a photo flip. I also picked out some coordinating epoxy dots and sprinkles for some extra oomph!


Once I figured out a layout in my head, I went ahead and cut down some paper to use on the purple background.

Green: 4.25" x 12"
Diagonal Stripes: 0.75" x 12"
Orange dots: 0.25" x 12"

Then I laid out the pieces and glued them down when I was happy with their placement. 


I used one of the more popular waterfall card dies (this one is called "Flippin' Awesome") and cut it out from the orange dot paper using my die-cut machine.


Typical cards with this particular die use 2 3/8" squares but I opted to make my flipping/waterfall pieces 2 3/8" x 3 3/8". As long as it fits the width of the piece then you can adjust the length of the flipping pieces (within reason, of course lol!)


And this is what the piece looks like when added to the page, and when you pull the tab at the bottom to make the piece flip around. 


I colored up these two and a pumpkin friend to add to the page using my Copics...


...and then fussy cut them out (because I was too lazy to drag out the Scan & Cut machine I usually use)!!


I then added them to the page with some of the stickers that coordinated with the paper line I used as well as some of the candy corn enamel dots. There are no pictures because I'm planning on using some pictures from Halloween 2021... 2020 was a bust for dressing up and going out, which I'm sure many of you can relate to!!


They were so much fun to work with! And I hope you enjoyed this walkthrough! Thanks for joining me and see you again soon!

lovies, =o) kel


August 21, 2021

Hallowe'en Trick or Treat Box Using Kawaii Halloween Pal Frankie Stein

 
Good evening all! DT Vannessa here again with a quick tutorial to show you how to make a cute treat box perfect for Hallowe'en. 

For this project I have used the adorable Kawaii Halloween Pal Frankie Stein clear stamp set from this month's new releases. Be sure to check out all the fabulous images, both in digi stamp and clear stamp formats! 

To start my treat box I am using a box template and some blackberry card...


After drawing round the template, I cut it out and score the fold lines using a small ball tool.


Using my bone folder, I crease all the fold lines.


I am going to make this treat box into a haunted house so when I add my stamped image it will look like he is going trick-or-treating, so I need lots of roof pieces, windows and some cute ghosties.


Making sure that the front of the box is on one of the sides with the flat top, I glue all my die cuts in to position.


I am now ready to add my cute Halloween Pal Frankie Stein. You can find the Copic combos I used for him so my blogpost here.


I then glued the treat box together and added Frankie on the front with the door. 


This is one side view...


I also added the Trick or Treat sentiment from the stamp set to the back.


Such a fun cute project to make and it was a quick make too, so could be easily replicated if you have several people to hand out Hallowe'en treats to. You could also use this idea to make a Christmas house and have a Santa image on the front delivering his presents. 

I hope you have enjoyed this tutorial. We would love to see any of your Stampers delights projects in our Facebook group

August 20, 2021

Layered Stamp Tutorial Using Chibi Too Cute To Spook

Good evening everyone. DT Vannessa here with another of my tutorial featuring some of the gorgeous new clear stamp releases from Stampers Delights

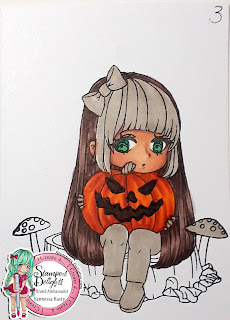
Today I am going to show you how I have made a layered image using the Chibi Too Cute To Spook clear stamp set to add to my Hallowe'en card.

For this project you need to stamp 5 of the same image with one of them being stamped onto the card for the blended background. This one can be set aside for now though. 


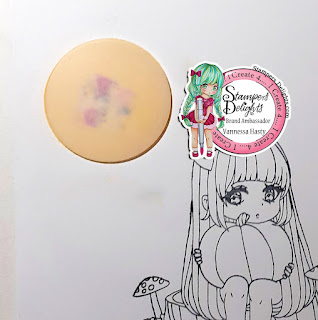
On this image, you can see that there are various pieces that sit more towards the front or more towards the back. The idea of this layered image creates more of a 3D effect, so not everything needs to be coloured in detail as some parts will not be visible until a particular layer. For that reason I colour the layered sections in grey using my W2 Copic marker.

On this first layer I have coloured just the left mushroom and the right stalk as these sit the furthest back in this image.


For my second layer, I don't need the mushroom on the left or the stalk on the right, as they will be cut off and therefore don't need colouring at all. I just coloured the tree stump and leaves on this one and everything else was coloured in grey again.


On layer 3, we are now starting to colour in the actual girl so her hair, the pumpkin and her face needed some colour. I did forget to stamp the Jack O' Lantern face on initially so added it here on this layer. The white sections are the parts that will be cut from this layer.


On the next layer I coloured the remaining parts, so her trousers and boots, the right top part of the mushroom, the stalk, her hands, her front section of hair and her bow. I didn't like how the first attempt on the bow came out, so I re-stamped it and tried again! 


Now comes the tricky bit, to fussy cut all the different layers out. The tiny pieces such as her fingers are really fiddly! If these bits are too tiny for you, you can always leave them out and just colour them in on the third layer instead. 


Using foam tape, I layered each section in place and you can see here how the 3D effect has taken place and really makes her stand out! 


This is the side view of the stamped image so you can see all the layers.


And now we move on the background for which I am using some stencils and my Distress Oxide inks. Using this stencil I am adding a moon using Squeezed Lemonade, Mustard Seed and Fossilized Amber. 


The moon looks very bright once it has been inked, but this will soon dull later on.


Using the pull out pieces from that same stencil I cover up the moon for now using a piece of washi tape again, doubled over to act as double sided tape. This allows the inks to go around the moon, without me making any mistakes and getting ink on it when I don't any! 


After adding lots of layers of ink until I got the shades I wanted, I added some stars from another stencil in white ink, so they were not stark white, but a dulled down version. I then added a little bit of grey ink to my moon to look like there are some clouds going across it. 


I then cut out some grass, a spooky tree and spooky fence to add to my scene. The grass blades have been inked as well in the same colour as the card. 


These are the layers for my card - a green card base, a black mount and my inked background.


Next up...add the die cuts. I left the gap in the fence as this is where my stamped image will go. Even with all the inking for the sky, I can just see where the stamp was so I know where to position everything in the scene.


Adding my stamped image and some white paint dots for more stars completes the card. 


And a side view of the card so you can still see those layers of the stamped image. 


I hope you have enjoyed this tutorial. We would love to see any of your Stampers delights projects using this technique in our Facebook group. Hope you will join us! 

You can find the Copic combos I used on this card on my blog post here.


Sponsorship Design Team

  Hey friends! Hope you all are doing great! We have new projects to share with you today and I hope you will visit each of them and give th...